NovaBACKUP PC/Server/Business Essentials contains a feature to mount volumes (partitions) inside your Image Backup to a drive letter in Windows (as a Virtual Drive) to be able to perform single file restore of files from within a completed Image backup file (.NDF, .NDD, .NDI file extensions are supported). This method can also be utilized to verify that your Image Backup file is valid.
NOTE: It is required to restart your computer once after utilizing the Image Backup (DR) function to initialize the software driver, which is installed for you when utilizing Image Backup functions for the first time to create an Image Backup Schedule job.
- If this is the first time you are attempting to mount an Image backup, make sure the appropriate drivers have installed in Device Manager. The device that should be there is named "OODISKIMAGE".
If you have successfully mounted an Image Backup, but cannot see files in your User directory, please read the guide here: Cannot Access Files On Mounted Image Backup (DR Image), Obtain file access permissions on read-only-mounted volume using Robocopy
If you are unable to mount image backups, please follow these steps
Starting with NovaBACKUP version 19.2, the Image Backup Mount drivers are no longer installed by default (for various reasons).
Please follow this procedure to install/update/repair the Image Backup Mount Drivers in NovaBACKUP:
- Locate the setup file you used to install the current version of NovaBACKUP on your machine
- Run this setup file, when it starts select "Maintenance", "Next", followed by "Change"
- Select the drop-down to the left of "NovaBACKUP Image Backup"
- Select the arrow next to "Virtual Disk Driver"
- Choose the option "Will be installed on local hard drive"

- Select "Next" until you "Finish", if prompted to reboot, choose "Yes"
- Close the "NovaBACKUP Download Installer" dialog if it is open
- You should now be able to mount an Image Backup
NOTE: You must reboot the machine to allow changes to the registry\drivers to be applied.
Mount Procedure
First of all you can only mount an Image Backup to a drive letter in Windows, as a virtual drive, if the image itself is stored on a locally connected storage device. Image Backups located on a network path cannot be mounted even though the file browsing interface allows you to browse to a network path to select the Image Backup, the image will not mount if it is located on a network path. Copy the Image Backup(s) to a locally connected storage device such as a USB hard drive in order to do this if that is the case.
Mounting your image backup
Click on image backup

Click on Launch Image Backup Tool for Backup/Restore/Boot CD Creation

Click on Tools

Make sure the Selected tool is set to “Mount Backup image volume to a drive letter”.
Click “browse” to locate your Backup image file. Select the volume you want to mount


Choose the Volume that is located inside the Image Backup that you want to mount

Select the drive letter you want to use for the mounted volume

After checking your selections, click on the “Mount” button and wait for the process to finish

!!Warning!!: If when clicking the "Mount" button after selecting the volume to mount you get a message about"Unable to mount" right away, first make sure you are not mounting a DR image located on a network path as that is not supported, copy that DR image file to a locally connected storage device such as a USB hard drive and retry this operation. And also if when clicking the "Mount" button after selecting the volume to mount you get an error that states the word "reboot" in the error, that can either mean that you don't have the Image Mount Driver ("Virtual Disk Driver" is what that component is named) installed, or you do have the driver installed recently but the PC hasn't been rebooted yet after that to actually complete the rest of the driver install (the reboot is 100% required); to install the driver read the one prior section to this, or alternatively you can read about how to do that in this other related KB article here, in order to get that required image mount driver installed (that a "Typical install" client install will not install for you by default), and then reboot the PC after that, and then retry the "Mount" button function after that and it should work now. Note: And, once you do have that driver installed, future client upgrades after that should be able to maintain keeping that driver in place, even if you were to do a "Typical install" method (the default install method), as long as that driver was installed already and is found during the next client upgrade attempts that are done (without requiring you to have to use the "Custom install" method each and every time, to need to select to install that same driver again every time, in that case).
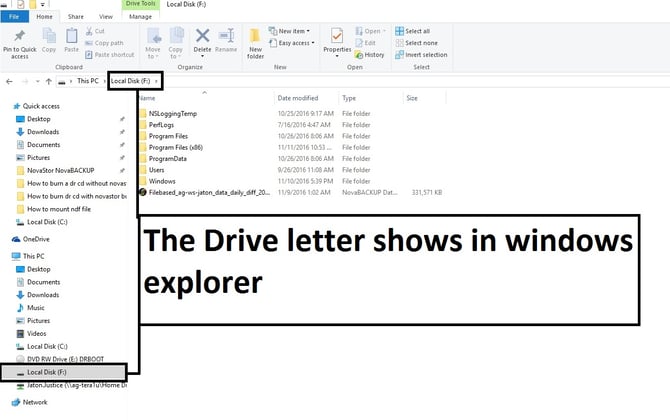
If the mount was successful then you can now see the drive in windows explorer, like as seen in the below example (or otherwise check in the Windows Disk Management app (using the "diskmgmt.msc" command) to check to see what drives are mounted (as possibly it wasn't given a drive letter that is visible in that case):

Unmounting your image backup
Go back into Tools and change the “Selected tool” to “Unmount Image from a drive letter”

Select the drive letter you want to unmount then click on the “Unmount” button

Wait as the program unmounts your image

After it says, “process completed successfully” you will have successfully unmounted your virtual drive.
