"Create Image" function dialog will fail to create an Advanced method boot media on Windows 11 24H2 (April 2025 Updated) OS (Error: oocode:CENgine::AssembleBootableImage:CreateSpecificWindowsImage:Result=General), if UAC (EnableLUA = 0) is enabled in the OS (it is default enabled in that OS, and it will normally be enabled in that OS out of the box we think) using the 21.2.404 and 21.2.422 client versions at least (but it will likely also be true for older client versions we think); which will result in a failure to create the boot media image in that case (with any ADK version, including the December 2024 Windows ADK and Win PE addon version).
- Create DR Advanced method boot media, as long as the standard KB article instructions that are provided in the "Complete instructions here" button when clicked on, which is the first step in the Advanced method boot media Wizard, and that same KB article is here, may fail to create image in the "Create Image" function dialog on Windows 11 24H2 (April 2025 Updated) OS, if UAC is enabled in OS (that will be enabled by default in that specific stated OS and version), with the error stated as: (Error: oocode:CENgine::AssembleBootableImage:CreateSpecificWindowsImage:Result=General). For more details read the how-to KB article here.
We have seen that after doing an internal test on a Windows 11 24H2 machine, if UAC (EnableLUA = 0) is enabled in the OS (it is default enabled in that OS, and it will normally be enabled in that OS out of the box we think), using the 21.2.404 and 21.2.422 client versions at least, as detailed in the 1st entry in the "Known issues and limitations with this version" section for the 21.2.422 client version, in the Changelog KB article here, with the Windows ADK 10.1.26100.2454 (December 2024) and same version Win PE addon, as well as with the older Windows ADK 10.1.22621.1 ADK version, which for the latter older ADK version is linked at the top of this KB article here, that the Advanced method boot media creation can fail to complete after about 4-10 minutes of time (but certainly not immediately, as if it does error immediately that is likely due to a different issue in that case), with an error at the bottom of the "Create Image" dialog, that states: oocode:CENgine::AssembleBootableImage:CreateSpecificWindowsImage:Result=General. In our initial internal testing on one such machine, that meets the OS specs in the first sentence, that issue can be worked around by disabling UAC in the OS (EnableLUA = 0) in the registry or with the command described here, or you can use our own more complete stated instructions steps below; and then do a reboot after that.
Screenshots of the workflow, after having already applied the workaround instruction steps to disable UAC in the OS (EnableLUA = 0), that should correct this issue, as a workaround at least:

While in the "Create the customized bootable image" dialog, which is only seen for "Advanced" method boot media creation, clicking on the "Create Image" button function in this dialog is where the problem will be seen, if UAC (EnableLUA = 1) is enabled in the same stated example OS: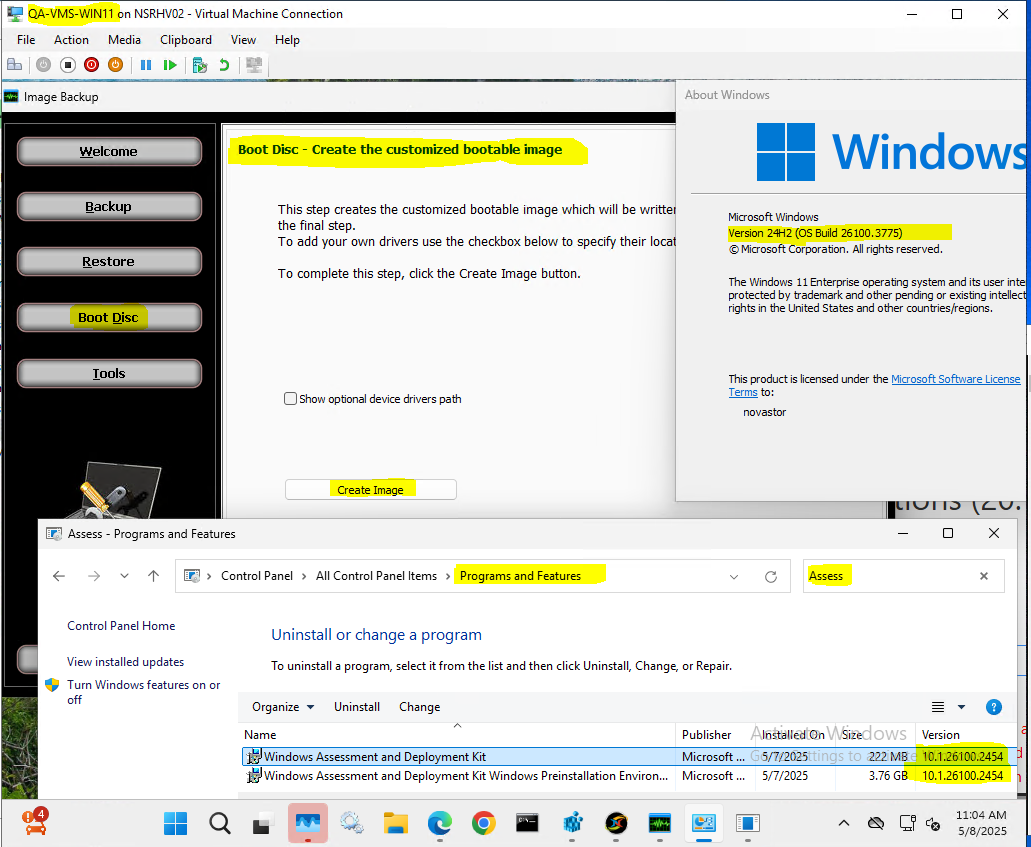
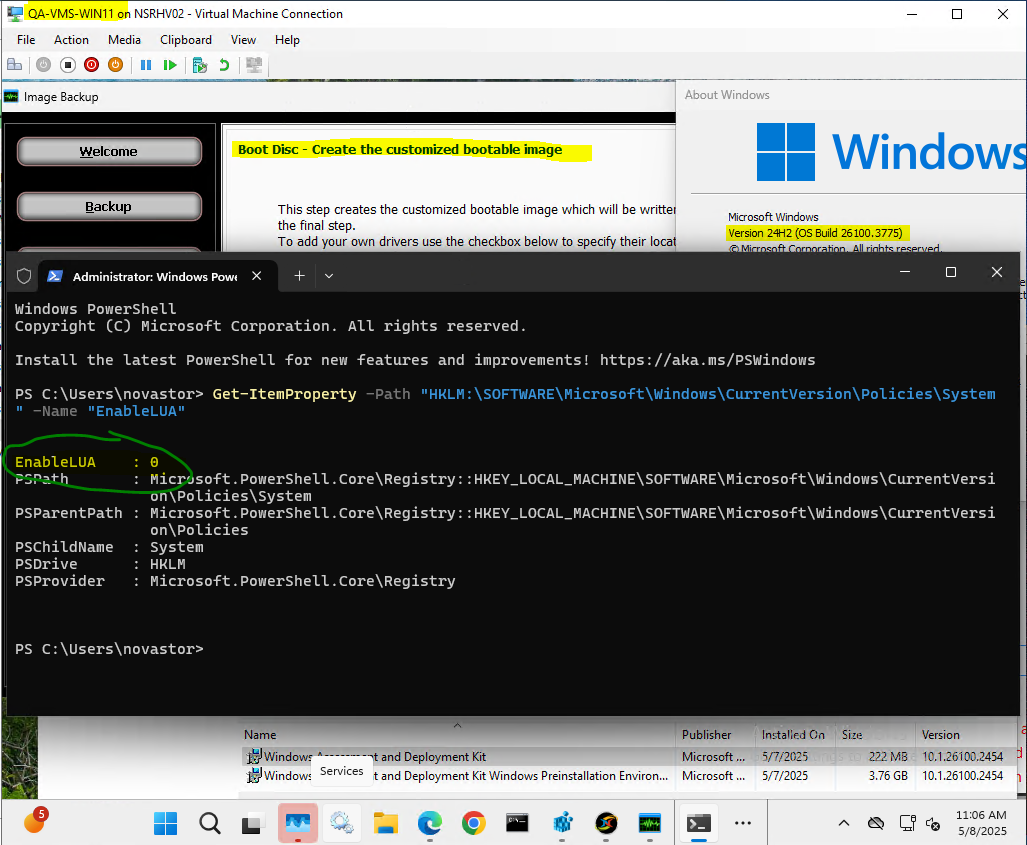
After checking the EnableLUA setting with the "get" command, which reports as disabled since it is a 0 value, which is the workaround to use to disable UAC (EnableLUA = 0) (with the "set" command, that is described in full in the "Simple workaround Instructions steps:" section below this) in the same stated example OS:
The "Create Image" button function create image process completed with the Success status here, but only because we have the stated OS workaround applied (otherwise it would have failed here, with the error at the end of this KB article subject, after about 5-8 minutes on our example internal machine):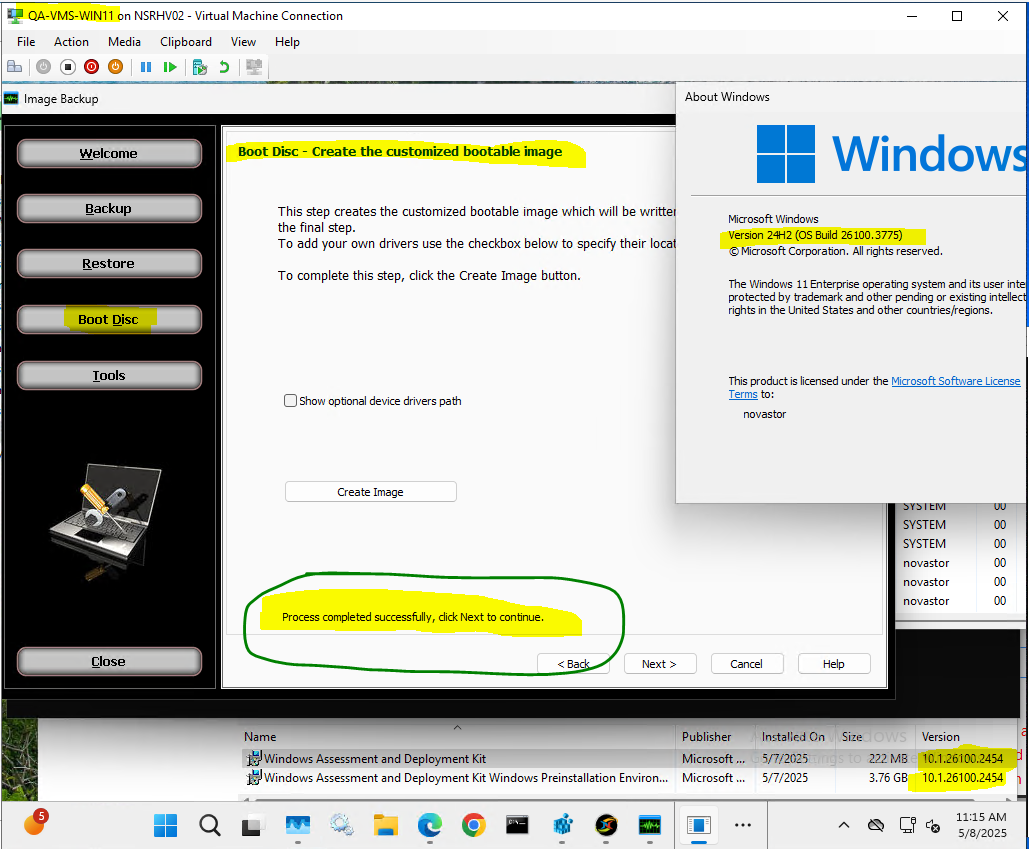
And the final dialog is seen below, that provides the device to write the created image to, either to CD/DVD, USB flash drive, or to just create the ISO file: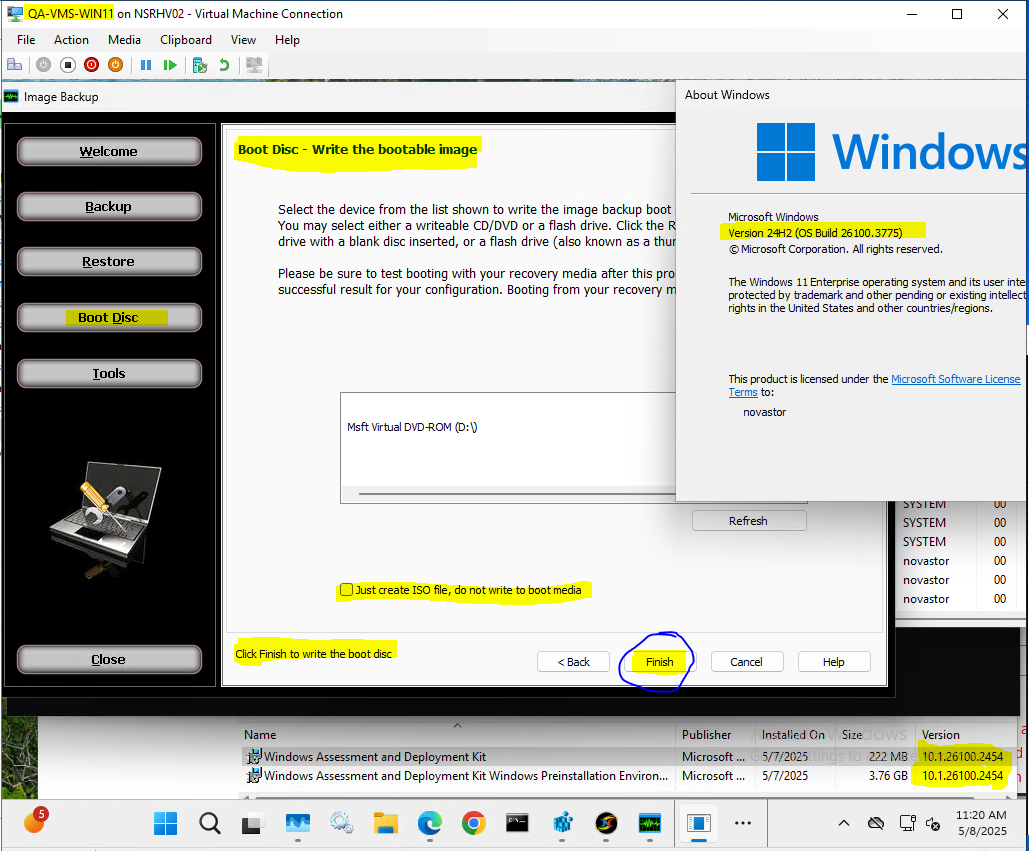
And if you did in fact choose the "Just create ISO file, do not write to boot media" option in the prior dialog, it should be able to write out that "DRBoot.iso" file to the stated folder in the last available dialog and the final step, that also states "Process completed.", as seen in this last screenshot: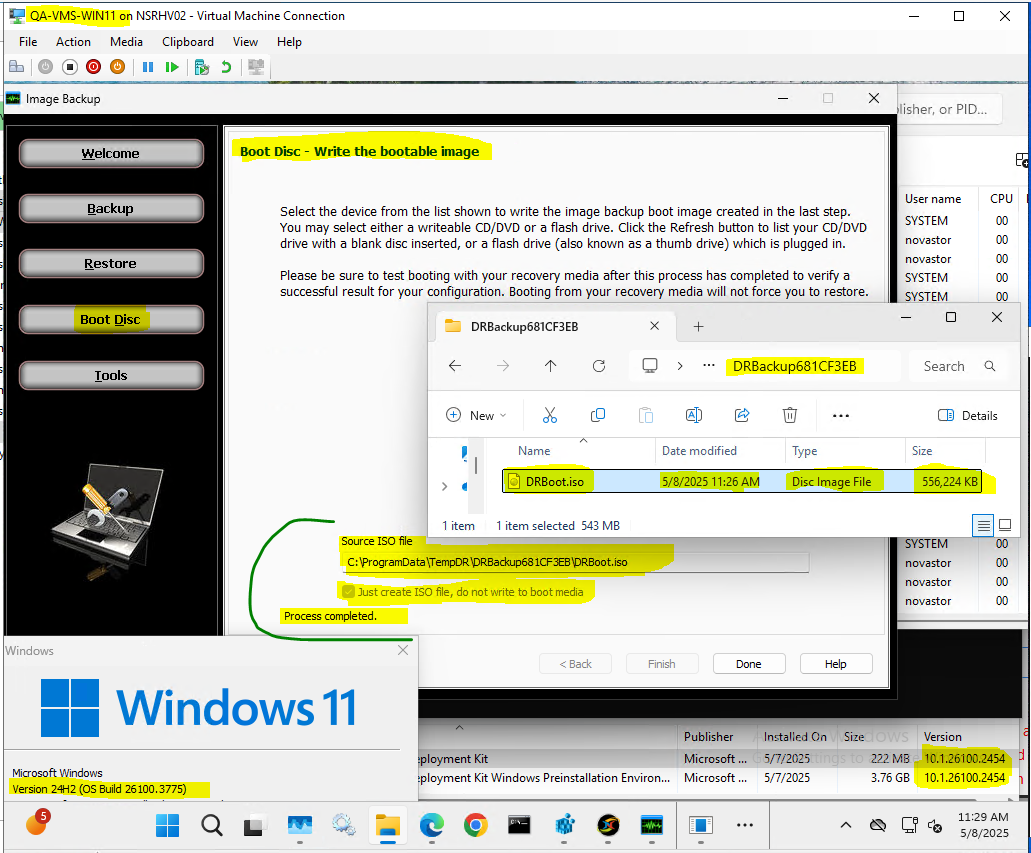
Simple workaround Instructions steps:
Start a "Windows PowerShell" (right-click and Run as administrator) app or a “Terminal (Admin)” app prompt in Windows 11 24H2, don't start an Admin Command Prompt though as the set of commands to run won't work there, while logged in as an administrator user, first to read what the current “EnableLUA” property value is, to read back that current property value to you with a get command, so that you know what it is, and then you will issue a set command to disable UAC (EnableLUA = 0) after that first get command:
Get-ItemProperty -Path "HKLM:\SOFTWARE\Microsoft\Windows\CurrentVersion\Policies\System" -Name "EnableLUA"
In the above get command output should in the first line of the output state if the current "EnableLUA" variable value is a 0 or 1, meaning is disabled or enabled. It likely in your case is enabled and has a 1 for that value, which means that UAC is enabled in the OS, as that is the out of the box default setting in the Windows 11 24H2 OS. The next set command stated below will disable UAC (EnableLUA = 0); which will 100% require a reboot after this change and step:
Set-ItemProperty -Path "HKLM:\SOFTWARE\Microsoft\Windows\CurrentVersion\Policies\System" -Name "EnableLUA" -Value 0
After the above set command is issued, if the command was entered in properly, a pop-up dialog in the system tray area of Windows may (but I did notice that sometimes it does not do this though, even though the above settings change was done correctly at this point) display for a few seconds, right at that point that you pressed the <enter> key on that above command, that will state "You must restart your computer to turn off User Account Control", and it is 100% the case that for UAC to be disabled you must reboot the machine, so do that reboot now. And then only after the reboot, you can test the Advanced boot media create process again and the "Create Image" function dialog should work with success now to create the image with Success after that is done: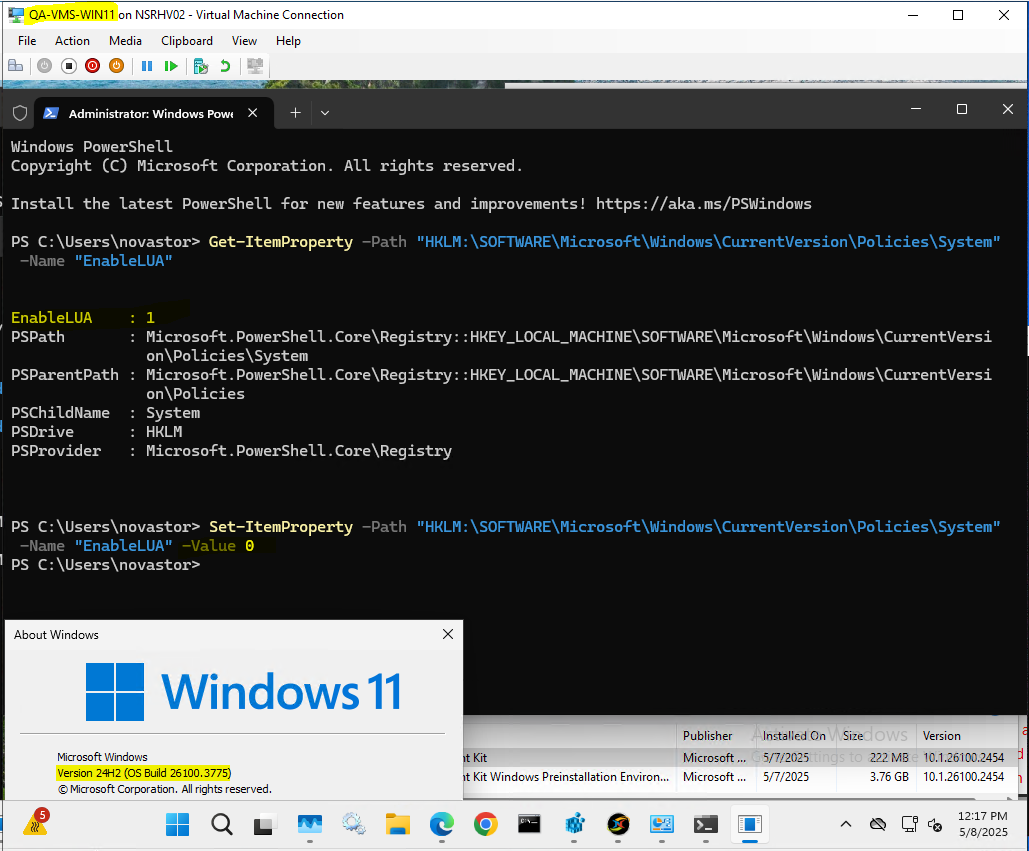
And then after you have verified that the Advanced boot media image was able to create the image with the Success status, with UAC (EnableLUA = 0) disabled in the OS at that point, in the same "Create Image" function dialog, which in this case is a completely optional step to need to do (but it may be that your security policies would advise not leaving UAC completely disabled in the OS in that case, as to the reason why you may want to re-enable it at this point, but just know that if you do re-enable UAC that the same Advanced boot media "Create Image" problem will return after that if you were to try it again on this same machine), if you would like to re-enable UAC (EnableLUA = 1) to revert that setting back to what likely was the default OS setting value (if that first get command had showed that it was enabled in the OS), you can issue this set command:
Set-ItemProperty -Path "HKLM:\SOFTWARE\Microsoft\Windows\CurrentVersion\Policies\System" -Name "EnableLUA" -Value 1
And right after issuing the above command and pressing <enter> on it, if the command was entered in properly, a pop-up dialog in the system tray area of Windows will display for a few seconds, right at that point that you pressed the <enter> key on that above command, that will state "You must restart your computer to turn on User Account Control", and it is 100% the case that for UAC to be re-enabled you must reboot the machine, so you will need to do that next, but only if you did do this completely optional step (to revert the UAC setting back to the, most likely, defaults):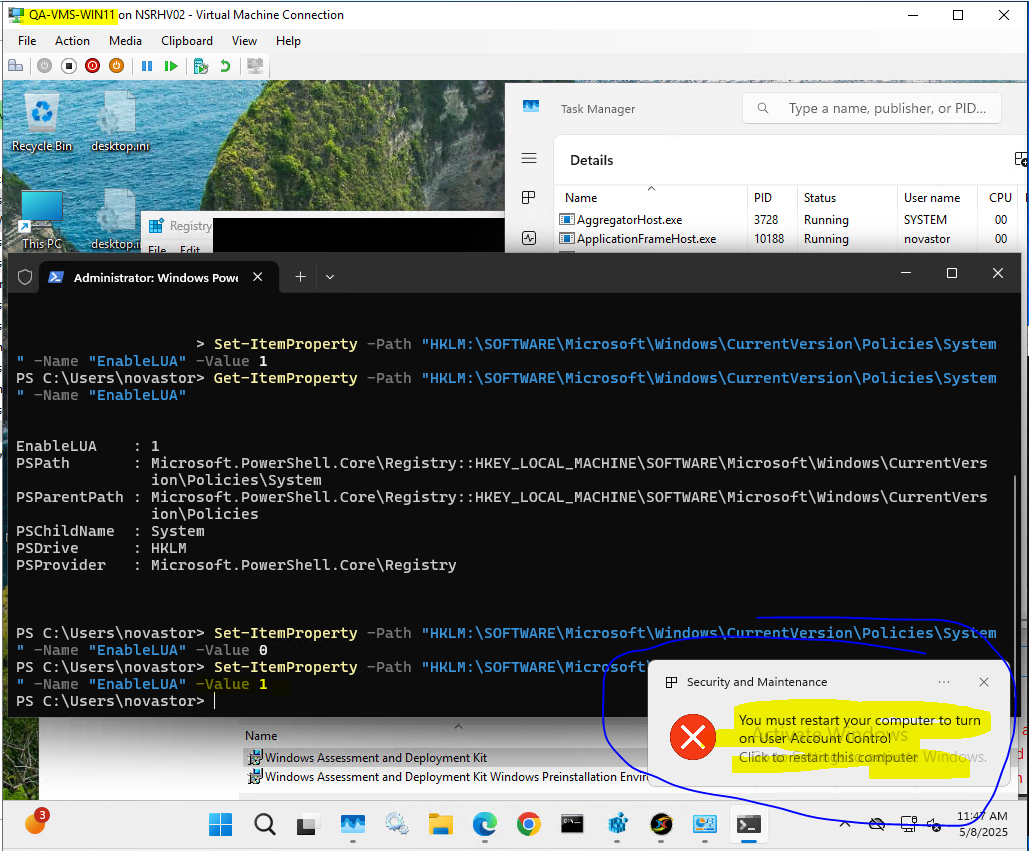
Note: This issue will likely also affect earlier versions of the backup client, not just the 21.2.404 and 21.2.422 clients that are stated in this KB article. It is also possible that the same issue will affect other OS's, but the only known OS to report about right now is listed in the KB article, and if that becomes untrue we will update the article to state any other OS's or versions of OS's that have been known to also be affected by this issue at that later time. It is possible that we may resolve this issue in the code, but for now you can utilize the provided workaround as long as it meets your environment requirements.
Note: The separate NBK plugins query problem, that is discussed in the how-to KB article here, at least in the backup client, does not seem to affect the same Win 11 24H2 OS that shows this Advanced boot media create fails problem in that case.
Edit: If the above stated (disable UAC) primary method workaround didn't work in your case, or if you are not willing to perform the stated workaround to disable UAC ("EnableLUA = 0") in the OS completely, and in fact that could be attempted to work around this or other stated issues in NovaBACKUP, for instance due to security or corporate policy concerns, as to it is not feasible to implement that change, then there are two alternate workarounds that you can use at that point.
Edit: If the above stated (to disable UAC, which 100% would require a reboot after the disable UAC is set in place, for it to be able to work) primary workaround method didn't work in your case, or if you are not willing to perform the stated workaround to disable UAC ("EnableLUA = 0") in the OS completely, and in fact that could be attempted to work around this or other stated issues in NovaBACKUP, for instance due to security or corporate policy concerns, as to it is not feasible to implement that change, then there are two alternate workarounds that you can use at that point. The 1st Alternate workaround method is to simply use different computer to build the Advanced method boot media with, even if it is a different OS, that in that case can be running a different OS than what the original machine had utilized (but where in the end the different computer doesn’t have the limitation that the original PC had for creating the Advanced method boot media), to install the same Windows ADK and Win PE ADK addon on that other machine and install the same version of NovaBACKUP client (in Trial mode will work) on that other machine (which doesn't have to be running the same OS in fact) to build the image boot media there, and perhaps add the same drivers into the boot media as you intended to add on the original computer (as long as you do have another computer to do that process), because keep in mind the NBK image boot media doesn't need to be built on the same PC, with the same hardware and devices on the PC, or on the same OS or a particular machine for where the Advanced method boot media is created on, to be able to work on the original computer (even if it contains different hardware and devices on it) in the end. And, on that same subject just realize what I had stated above, that you do not need to utilize the original computer to create an Advanced method boot media on, that could be any computer really, since if the Simple mode boot media works on the original machine the only reason why you would need to use an Advanced method boot media creation choice on would be that you need to add some additional device drivers (such as NVME & SCSI "Storage controllers" related drivers, or network adapter drivers) to the Advanced method boot media, and in that case any Windows 10, Windows 11, Server 2019, and Server 2022 OS machine, that is a 64-bit/x64 Windows OS, should be able to accomplish that task in the end (if UAC is disabled in the OS at least, to do with the primary workaround method), the drivers are not automatically collected from the source computer that you are building the Advanced method boot media on, that is up to you to supply the correct device drivers (folder structure for the drivers) manually during one step in the Advanced method boot media creation process, to tell our software what drivers to include in that boot media (the computer that you are building the Advanced method boot media is basically agnostic to the source OS and source machine hardware, and does not need to match the target machine hardware, other than both the source and the target computer to use the image boot media with would need to be x64). The 2nd Alternate workaround method to at least try and utilize (but you must know about the two items that are downsides to using this 2nd alt. method of workaround), you can also change the "drdiag" service (which is the "Disaster Recovery Imaging" service name, and the "nsService" service (which is the "NovaBACKUP Backup/Copy Engine" service name) "Log On As" setting, in "services.msc", which by default will be set to use the "Local System" user, to change it to use a local or a domain Administrators user, that could be your primary user or it could be a "NovaBACKUP" user even, as long as that user is a member of the "Administrators" group and/or the "Domain Administrators" group, and then restart that same service. Just know that if you do implement that alt. workaround method that two things will be true, that A. the "Run As" setting for all job types will become unusable for if it is set to utilize "Run as specified user" then running those backup jobs will immediately fail with a service exception, because the nsService itself you told to be permanently assigned to a single user already, the client software will be locked to that one user for all functions, and B. that settings change won't survive future NovaBACKUP client upgrades, as the setting will become reversed back to the default "SYSTEM," user, so you'd need to remember to reapply that change after every client upgrade or client repair action. Also, there is a chance that if you do this 2nd alt. workaround method, that Image Backup (DR) functions may break and show issues after that change, and in general we don't recommend that the nsService be changed from the defaults (as it tends to cause problems in various functions, so you need to be aware of that fact before choosing to go with the 2nd alt. workaround method in that case).